How to Build a DIY Pallet Chicken Coop: Your Guide to an Affordable and Convenient Home Composting System
Do you love the idea of raising chickens in your backyard? But think a traditional chicken coop is just too boring and ordinary? If so, you’re going to love this post! We are thrilled to share with you how to build a DIY pallet chicken coop. Let’s get started! >>> If you want to be the envy of your friends and neighbours, then raising hens may be right up your alley. Keeping chickens can be an amazing source of fresh eggs, plus it’s also educational for children and adults alike.
You don’t have to buy some expensive prefabricated chicken house when these cool pallet coops can be built for much less money. They are also very easy to build. Even if you are not usually handy, you will find that constructing one of these coops is not that challenging at all. You don’t need any special skills or certifications, just follow the instructions below and in no time at all you will have a fantastic new home for your hens! Here are some ideas on How To Build a DIY Pallet Chicken Coop:
Depending on the size of your pallet coop, you will need a few pallets. You can repurpose old pallets that have been sitting around or you can buy them new. You will also need some plywood, nails or screws, a power saw and a hammer, a crowbar, a measuring tape, a level, a pencil, safety glasses and work gloves. If you are planning to add roosting bars in your coop, then you will also need a few more items: a drill, a pencil, a rooster or other wooden stick, a jigsaw or a circular saw, and a few boards to serve as the roosts.
Step 1: Find and Acquire Your Pallets
When it comes to where to find pallets, be on the lookout at your local grocery store or other businesses that receive a lot of product deliveries. They often have pallets that need to be discarded. As a rule of thumb, look for pallets that are clean and in good shape. Marked “clean and safe for food contact” with a company name and logo, a pallet is usually okay to use.
However, if you find one without the markings, be sure to clean it thoroughly before constructing the coop. You will also want to check for nails or other debris that may have become embedded in the wood. You don’t want to accidentally have your chickens ingest some rusty nails! If you find any, be sure to hammer them out.
Step 2: Cut the Wood and Create the Walls
Once you have acquired your pallets, you can begin to cut them to size. You will want to measure the inside of your coop to get the dimensions of the pallets. You will also want to make sure you leave enough room for the floor. You can use a power saw to cut the pallets, or if you don’t have one, a hammer and a crowbar will work just as well. Just be sure to wear safety glasses to protect your eyes. Once the pallets are cut, you can proceed to the next step.
Step 3: Build the Floor and Run
Now that you have the walls of your DIY pallet chicken coop, you will want to add a floor. If you are building a large coop, you can simply lay the pallets as is. However, if you are building a smaller coop, you may want to put a few pieces together to make a larger piece. You can hammer the boards together or use a nail gun to nail them together.
Once your floor is in place, you will want to add a run. A run is basically like a small fenced-in area that your chickens can freely roam in. It should be high enough so that predators cannot get in. If you are building a small coop, you can simply add a run to your coop. However, if you are building a larger coop, you will want to make sure there is enough room for the run to fit as well.
Step 4: Roof and Windows
Your next step is to add a roof to your coop. Again, if you are building a large coop, you can simply lay the pallets as is. However, if you are building a smaller coop, you will want to put a few pallets together to make a larger piece. You can hammer the boards together or use a nail gun to nail them together.
Once the roof is in place, you will want to add windows to the coop. If you are building a larger coop, you can leave them on the outside and use shutters to close them. However, if you are building a smaller coop, you will want to add windows on the inside. If you are building a smaller coop, you can simply cut a hole in the wall and add a window there. However, if you are building a larger coop and want to add windows, you can use some boards to cut out a window.
Step 5: Add a Lock and Decoration
Your last step is to add a lock to the door. If you are building a larger coop, you can simply use a piece of wood to act as a door and add a lock to it. If you are building a smaller coop, you can simply use a pallet board and nail it to the door. You will also want to decorate your coop. You can paint it, add a shingle roof or anything else that you think would look nice. Your coop doesn’t have to be plain and boring, so be creative and add some flair to it! Once your coop is finished, you can begin to introduce your hens to their new home.
Conclusion
Building a chicken coop can be a fun project for the whole family. With the tips above, you can create a beautiful and functional coop out of pallets in no time at all. For the cost of a few new pallets, you can have an excellent home for your hens. Plus, with all the rustic charm a pallet coop brings to the table, you will be the envy of your neighbours in no time at all! Now that you know how to build a DIY pallet chicken coop, what are you waiting for?
Building a Chicken Coop: Step-by-Step instructions with Pictures
If you’re raising backyard chickens in your home, you’ll need a chicken coop to house your feathered friends. A chicken coop serves as a secure and comfortable home for your hens at night and when they are not roaming the yard searching for bugs to eat. Building a chicken coop is a great DIY project. The materials needed are relatively inexpensive, and the construction process is straightforward. You can build an attractive and functional chicken coop using these step-by-step instructions with pictures.
It will be an investment that returns many benefits for years to come! Keeping chickens in the backyard instead of letting them roam free offers several advantages. Your fenced-in coop will help keep their nesting area tidy and protect them from predators like coyotes, foxes and raccoons that would love nothing more than to make a tasty meal out of those fluffy backyard birds. Knowing what kind of chickens you want to raise is important before building any type of chicken enclosure, since some breeds have special requirements when it comes to housing and food availability.
What You’ll Need
The materials needed to build a chicken coop will vary depending on the type of coop you decide to build. – Wood. You will need lumber for framing, flooring, and paneling. The type of wood depends on your location and the design of your coop. In humid environments, you can use cedar, but in other areas you should use pressure-treated lumber. – Hardware.
Studs, gussets and screws are used to build the frame of the coop and attach the walls together. – Nails and screws. These are used to frame out the coop and build the interior panels. – Siding. This material is used to cover the outside wall of the coop. You can use plastic, wood, or metal siding. – Insulation. This is used to line the walls in the coop and help keep the chickens warm in the winter. – Roofing material. You will need to install a roof on the coop to protect it from the elements. – Hardware cloth. This material is used to cover the floor of the coop. Learn to build an awesome chicken coop using these step-by-step instructions with pictures below.
Building a Chicken Coop With Step-by-Step Instructions & Pictures Download
Step 1: Decide Where to Build Your Coop
Where you build your coop will depend on several factors. First, you’ll want to choose a location that is close enough to your home to be convenient, but far enough away to keep the chickens from annoying your neighbors. Depending on zoning laws in your area, you may not be able to keep chickens in your backyard, so check with your local authorities to see if they are permitted.
Step 2: Create a Framing Plan
You can build a coop using many different framing methods, but the best approach is to build using a square or rectangular frame. Constructing a rectangular coop is easy, but it’s important to make sure the framing is square to minimize the amount of shoddy work that goes into it. Squaring a frame before you start building will ensure your coop is level, sturdy and attractive. If you live in an area with high winds, you may want to build a round coop.
Step 3: Build the Coop Walls
The first step in building a chicken coop is constructing the walls. The best method is to use a “stud-and-ledge” construction, meaning that you will build your exterior walls using standard 2x4s as studs, and attach 5/8-inch plywood planks to the outside of the studs as the “ledges” where the siding will be attached. Constructing the walls using this method ensures that your coop will be sturdy, attractive and long-lasting. You can also use pressure-treated plywood “wall-board” if you prefer, but make sure it’s 5/8-inch thick. Before attaching the siding, install a top edge or “kickboard” where the roof will rest.
Step 4: Install the Roof, Windows and Doors
The next step is to build the roof. The best roofing material for the roof of your coop is asphalt shingles, but corrugated plastic roofing is an alternative that will help protect the birds from predators, sunlight, and precipitation. If you choose to install a shingled roof, you will need to install a drip edge to prevent water from dripping back into the coop. Before installing the shingles, apply a strip of tar paper to the roof decking to prevent leaks.
You can also install a layer of roofing felt under the shingles to help prevent leaks. You will also need to install windows on the coop, and you can choose any kind you like, but be sure they are large enough to allow enough light inside the coop without letting out too much heat. You can install the windows anywhere, but be sure they are securely attached so they don’t blow open in high winds or fail when a heavy snow falls. You may also want to install a door on the coop so you can easily check on the chickens.
Step 5: Add the Floor and Roofing
The next step is to build and install the floor. The best material for the floor of the coop is pressure-treated plywood, and it’s best to build the floor on top of a concrete slab. You can also install a drainage system underneath the floor to help keep it dry. If you installed a shingled roof on your coop, you will need to install a layer of hardware cloth underneath the shingles to prevent rodents from burrowing up through the roof.
Step 6: Install Final Facings and Trim
After the coop is built, you can install finishing touches to make it look nice. Install an attractive door lock, and trim the walls with galvanized metal or wood siding if you didn’t use it on the exterior of the coop. You can also install a decorative finial on top of the coop, and if you want to extend the coop, you can build an attached “porch” with the same materials and design as the coop.
Conclusion
Building a chicken coop is a great way to expand your backyard homestead and add value to your property while saving money in the long run. The best approach is to build a coop that is functional and attractive, and with the information in this article, you can do just that! build a chicken coop using these step-by-step instructions with pictures & you should be good to go Download Now!
TikTok is the latest app to become popular among Gen Z, Millennials, and even older users. Those who are using TikTok may wonder how to turn on direct messages. It’s a simple process with a few steps, but you shouldn’t have trouble figuring it out. If you’re new to Instagram, Snapchat, or any other social media apps, you might be confused as to why they all require different sets of features to be turned on in order for them to work properly. This is partially because more people than ever before use social media and therefore demand that their favorite apps cater to them. However, this also poses some challenges for those who are trying to figure out how to turn on direct messages in TikTok.
What Are Direct Messages on TikTok?
A direct message, or DM for short, is a private message that you can send to your friends or followers on social media. This is different from a comment or a story, both of which are public. A DM is sent to someone as opposed to everyone who follows you. When you send someone a DM, they will receive a notification if they have the setting turned on. If they do not have this feature enabled, you will have the option to “add as friend.” This is an easy way to make sure that you don’t accidentally send a DM to someone who doesn’t want to receive them, but it can also be a bit of a nuisance.
How to Enable Direct Messages on TikTok
When you first open TikTok, tap the Settings icon in the upper-right corner of the screen. This is a white icon with a gear design. You will be directed to the app’s settings page. On this page, tap Chat. This is located in the upper-right corner. You will now be taken to the Chat page, where you can turn on direct messages. Tap the slider button to turn on the feature. TikTok will prompt you to enter your phone number. This is because TikTok uses your phone number to create your account, and it must verify that you are the rightful owner of that number. TikTok will send a verification code to your number. After entering the code, you will have the option to turn on notifications. This is so that you can see when someone sends you a DM. Lastly, you will be asked to enter a security code. This is to ensure that no one else has access to your account. After entering this code, you will be able to use direct messages on TikTok.
What to Know About Using TikTok’s Direct Messages
As mentioned earlier, if you don’t enable DMs, anyone can add you as a friend. This can be annoying for some and especially those who may not want to receive DMs. There are some restrictions when it comes to using DMs on TikTok. First, you can only send DMs to people who follow you. You can’t send DMs to total strangers. Second, your DM limit is 10 per day. This may vary from one user to another, but it’s a reasonable amount.
Is It Safe to Use TikTok’s Direct Messages?
While there are bad actors in every aspect of life, you can safely use TikTok’s DM feature. TikTok has thousands of workers who are dedicated to removing inappropriate content. TikTok also employs algorithms that are designed to detect and delete inappropriate content before anyone can see it. You can feel safe using TikTok’s DM feature. That said, you should still practice common sense when using this feature. Avoid sending personal information like your phone number or address, and you should avoid sending unsolicited sexual messages. If someone is contacting you inappropriately, report the user and move on.
Tips for Using TikTok’s DM Feature
If you’re new to social media and you want to try out TikTok’s DM feature, there are a few things you should keep in mind. First, you should have an idea of who you want to message. You can’t just message anyone, and you should avoid short and meaningless messages. Make sure that you’re using the appropriate hashtags. Include your location and make sure that your bio is up to date. If you’re using TikTok for your business, you may want to consider paying for some advertising on the app. This can help you to reach a wider audience and connect with more people.
Final Words
Social media is a great way to connect with people all around the world, and direct messages are a great way to do this. If you want to turn on direct messages on TikTok, all you need to do is make sure that the feature is enabled. If you’re not sure how to turn on direct messages on TikTok, don’t worry. You can use this article as a guide to make sure that your account is set up properly.
Let’s. Talk about chicken coops! Why? Because they’re, the one of most popular topics with chickens but Jack besides chickens themselves. As soon as somebody wants chicken, they’re looking into coops, but listen coops are so much more than just their shelter.
For me, coops are at the heart of the working machine. That is the Fox potential. The first thing we’re going to talk about are the five different coops I use and how I put them to work for me, then I’m, going to share with you the four basic functions of what makes a great coop Five basic designs that ensure their health and your sanity, then we’re, going to look at the four must-have features of the coop.
So first let’s. Look at my the five different coops I use as working machines around this farm. First up is my chicken tractor. I use it for a small chicken coop for twelve birds or less. If it’s just there hotel, I use it as a coop.
Inside of a chicken garden, I’ve used it as a chicken tractor to till manure and even harvest produce. I’ve used it as a maternity ward. One of my readers used it for a broiler pen to move around meet birds to raise them from chicks until slaughter.
This thing will hold up to 12 Birds. If it’s just their hotel. I would say four: if they’re in it full-time it’s, going to cost you less than two hundred dollars the plans for it are down in the video description.
The beneficial features of this thing is that it has a door. So it can also serve as a coop and a chicken tractor. It has built-in perches it’s short, it’s, got a swivel landing bar it’s, got milk crates for nesting boxes that can be accessed from the outside it’s got plastic PVC on the bottom.
So it can easily slide over terrain. It’s, got high hooks on either in and a cable attachment, so you can pull it from either side. Next scoop is the pastured poultry pen, a classic from Joel Salatin.
I’ve, used it to pasture meet birds like Joel. I’ve, used it as a maternity ward for Mama hen and her baby chickens. I’ve, used it as permanent housing for a small flock. You could use it to prep a larger garden bed, it’ll hold up to 75 Birds, and I say you could probably build it for $ 300 or less easy plans below the beneficial feature.
Is that it’s? Sure square one-quarter open on top one-half of the sides are open. I’ve, built nesting boxes in mind to make it even more multi-purpose and it’s. Got PVC skids to make it movable you don’t need a special dolly to move it.
Next up is Harvey uh Suri’s. Small-Scale poultry flock a frame I’ve used this thing as a maternity ward. Right now. I’m growing little chicks in there transitioning them from the brooder to the big house.
I’ve used it as my main coop to move the main flock around the yard. As long as the you want to go too far with it and it’s relatively smooth and not too hilly, this works great for that the beneficial features include.
The perches are also the braces. The nesting boxes are accessible from the outside the wheels. Well, –, there’s, wheels on it all these. All these coops are mobile. That’s. All beneficial the wheels are removable, so you can collapse this thing down to the ground for extra protection.
It could be used as a chicken tractor, meaning you could confine them in it and have them be tilling and fertilizing the ground, and this coop will hold up to 36 adult birds. It’s, going to cost you around 500 bucks.
I’ll, leave the link to mr. Harvey o Suri’s plans below and now my favorite one person can easily move a lot of birds long distances over rough terrain, the chick sha. I use it for my main coop and moves my main flock around right.
Now they’re on a till job. They can go out into the pasture and fertilize the pasture maybe follow the cattle. I can move them to a compost, job or a job where they need to be spreading mulch. The beneficial features include large wills.
It’s high off the ground, so the chickens can also use it as a shade. During the day the door becomes the ramp, the pool bar becomes the prop pole. The roof is also an access point. There’s, room for supplement, feeders and a dust box.
Nesting boxes are in crates that are accessible from the outside. The roof. Flip allows for ventilation, the white roof reflects the Sun, and if you want, you could switch it out with a clear roof to collect the Sun there in the winter.
The perches are also the floor and this thing is going to cost about $ 500. Depending I mean I have had people just really scrap it together for about 150, but if you go to the store it’s going to be about 500 and it’ll hold about 36 birds, and if you want to build this, One I’ll, leave the plans in the description.
Next, let’s. Talk about the coop! Most people. Have it’s, the static coop I don’t, use it much because I don’t, get as much work done out of it, as I do the other ones, but there’s still a place, and Most of you might have that, so I’ll talk about it.
I’ve, used it as a housing for my guineas, I’ve, used it as a static run when my health wasn’t so good. You could certainly use it to build compost if you’ll just put deep bedding and fishel features include a bucket nest, a ladder perch and deep bedding.
This is a bucket nest box shelf. All you got to do is build this shelf, but place five buckets along through there and you ‘ Ll have to build any nest boxes. The way that deep netting works. Is you get enough organic material onto the floor? Hopefully your chicken coop doesn’t have a floor if it does take it out, put at least eight inches of granite or of a Granik material leaves straw, wood chips.
Anything like that. Let it sit there. The chickens will have access to it. They’ll scratch it. They’ll manure, it they’ll mix it together and eventually, on the bottom of that, you’re, going to start to develop, compost and to harvest.
That I mean I’ll, come back here in diamondhead, chicks in here full-time for years, but I’ll. Still I’ll, come back. I’ll, move the mulch off the top and harvest the compost from underneath with a shovel and take it put it where I need it to go.
It’s, pretty neat system. You can do that not only in the coop but out in the run. Now hang on a second, I’m going to go over what makes these such great coops. I’m, going to talk about the features so on now to the four basic functions of a chicken coop.
Let’s. Take my chick Shaw as an example. The first thing the first function is shelter. You want enough shelter from the Sun wind rain, the basic elements, no duh right at least one square foot of covered area per bird.
It should be closed off to the cold and windy side should provide shade from this. Oh, I’m talking air. It should provide shade from the Sun with that roof, but also in this one shade from the Sun down below, underneath as for winter zones, three and above you, don’t, have to worry about any special insulation or anything like that.
If you’re in those colder areas, I would suggest maybe a greenhouse during the winter, but all the rest of you. You probably just need to open up even more. I mean I know that sounds backwards, but open up the front of it to the sunny side.
This side is pointing to the sunny side. The chickens are resilient. They they’re up to 109 degrees in temperature. They’ve got these big feathers. They took their heads and underneath they’re going to be just fine, they actually need that ventilation that fresh air it’s, not the cold.
That’s, going to kill them. It’s, the combo of cold and moisture. So you want that free-flowing ventilation to keep them warm. The second aspect of a great coop is adequate access to sunlight notice. How half my front is open up towards the front towards the Sun? A third of the side is open up not only for the Sun, but for fresh air and 25 % of your roof can be open if there’s enough shelter for the birds and the covered parts.
The third aspect is plenty of ventilation. You see here, the third of my side is open. All my front is open. There’s; ventilation through my nest box, built-in ventilation to my roof notice. They do have some protection here.
You don’t want them to be all hundred percent out in the open notice how they can get behind these panels. But you stop ventilation over here and you still have ventilation on the top. A good rule of thumb is put as much ventilation as possible above where they perch.
The fourth part of making a good design for the birds is making it predator proof real easy to things for the coop one shut them up at night. That’s, going to be most of your predator problem to make no more than one inch opening anywhere in the coop.
Now let’s. Talk about basic design! You need one square foot per chicken if it’s their hotel, you want to be able to access the eggs from the outside, so you’re, not crawling up into a coop. Make it easy to harvest deep bedding.
Also make it easy to clean people want to know. Well, how do you clean your coop? How often you clean your coop that’s? Actually the most popular question? Well, I’ve, never thought about it, because I never have to clean a coop.
These are self cleaning, mainly because they’re floralis. We leave the manure and feather debris and anything else behind it’s falling down to the ground and we move on one square foot per chicken access to the eggs from the outside self cleaning.
Finally, let’s. Talk about the four must-have features which include perches is nest. Boxing dust boxes and food supplement. Containers perches are places for the chickens to sleep at night out in nature, birds jump up onto a limb and sleep there throughout the evening.
So we’re going to recreate. I recreate that with two by twos. You need to give them at least nine inches or a good rule of thumb is like the surfs up like from my pinky to thumb. They don’t need much room.
Actually, if you give them a lot of room people ask me why you break the real way you don’t give the chickens enough. I give them plenty. I’m, recommend 36 birds in this. I think I could do 50 here’s.
Why? Because, when they go in their perch, I don’t care. If they’ve got all the room in the world. They end up all up near each other. Now for nest box a place for your chickens to lay eggs roughly 1 cubic foot.
They naturally want to seclude a place, so we put it up and away and to the side. You want to make sure your nest box have roofs or up near your coup proof so that birds, don’t get on top of it perch and manure into the nest box.
I’ve used this milk crate. I just cut out an opening. You want a blip in the front so that the bedding doesn’t come out for this bedding. I love using hay. You could use wood chips, shredded paper, pine shavings, anything like that make sure you provide a landing bar, so the birds can jump up on that and then crawl into the nest you want to get saucy make it swivel, so it can also be a nest blocker In case you got some wanting to perching there at night.
You can come out here in the afternoon and swivel that up and block them from getting in there and then let it out in the morning, so they can lay their eggs notice. How my nest boxes are above eye level, that’s, important, because if you leave your nest boxes at eye level, the chickens get bored, see the eggs and start pecking them.
Another self-cleaning feature here, because I use these milk crates. They actually have a mesh bottom, and so a little fine debris and dirt actually falls through and the meting for the most part cannot another cool thing about these nesting boxes.
I can pull them out and actually use them to carry eggs or to carry a broody hen that’s, it. Those are my five different chicken coop systems. I’m currently using hope you enjoyed it. I got an article linked below if you want more information plus i’m on a live webinar with my wife June 12th, 3:00 p.
m. Eastern Standard Time will be on their answer. Any questions you have, we’ll, go into this into more detail. What’s hot for an hour and we’ll help you figure out, which one is exactly right for you sign up below.
Gold coast shooting left a Chicago rapper Fbg Duck dead tuesday afternoon. Aссоrding tо friends, twо оthеrѕ were seriously hurt. Chicago роliсе said thе ѕhооting hарреnеd juѕt before 4 40 p.m, Nеаr 70e оаk street роliсе ѕаid, еаѕt оаk ѕtrееt is tурiсаllу known fоr ѕоmе of Chicago’s, mоѕt еxреnѕivе ѕhоррing, but it turnеd into a сrimе scene, tuеѕdау, rаttlеd bу gunfirе аnd littеrеd with bullеt саѕingѕ.
Three people wеrе shopping оn оаk ѕtrееt when twо vеhiсlеѕ рullеd up, fоur people exited thоѕе vehicles аnd ѕhоt аt thе ѕhорреrѕ оn thе sidewalk роliсе ѕаid the оffеndеrѕ then рrоduсеd firеаrmѕ аnd firеd ѕhоtѕ at all thrее viсtimѕ, роliсе ѕаid in a statement tuеѕdау evening.
Thе ѕhооtеrѕ flеd thе scene by car роliсе ѕаid a 26-year-old wаѕ ѕhоt in the сhеѕt, thе grоin and the nесk. He wаѕ transported to nоrthwеѕtеrn hоѕрitаl whеrе he wаѕ pronounced dead juѕt after 5pm роliсе said multiрlе friends аnd реорlе who knоw the dесеаѕеd mаn idеntifiеd him as Chicago rapper Fbg duсk.
Thе cook county medical examiner’s offiсе idеntifiеd him аѕ Cаrltоn Weekly оf Mаrkhаm. A woman 28 was ѕhоt in the hаnd аnd tаkеn on Saint Joseph Hоѕрitаl, whеrе ѕhе wаѕ in stable соnditiоn. A 36-уеаr-оld mаn iѕ in ѕеriоuѕ соnditiоn аt Northwestern hospital.
Aftеr hе was shot in thе bасk and ѕidе, оnе guу рullеd оut a gun аnd start ѕhооting аt the оthеr guу сlоѕе range аftеr thеу stopped ѕhооting thе guу who wаѕ doing thе ѕhооting ran that way. A witnеѕѕ ѕаid Chiсаgо community асtiviѕt Jamal Green ѕаid ѕеvеrаl реорlе called him аbоut thе shooting he wаѕ tоld.
Fbg duck wаѕ shopping with friеndѕ whеn someone fired shots аt thеm, аѕ they were exiting Oаkѕ fifth аvеnuе роliсе said thеу wеrе standing оn the ѕidеwаlk nеаr thе dоlсе аnd gаbbаnа stall. Just a few ѕtерѕ frоm Miсhigаn avenue grееn dеѕсribеd thе 26 year old аѕ a wеll-rеѕресtеd wеll-lоvеd rарреr, but аlѕо аѕ a well-hated оnе in the music wоrld.
A lоt оf уоung реорlе lооkеd uр to him аnd likеd his muѕiс grееn said thеу will nееd hеlр сорing with the lоѕѕ. I wаѕ ѕtаnding hеrе and ѕаw реорlе running in every direction, trуing to lооk fоr cover lосаl buѕinеѕѕ оwnеr Hоwаrd Gоrdоn said i was standing where wе are standing now аnd hеаrd what i thоught wаѕ a machine gun аnd thеn a blасk саr ѕрееding down oak street going Wеѕt buѕinеѕѕ owner Bаrbаrа Gordon ѕаid ѕhе соuntеd about 17 ѕhоtѕ.
Shорреrѕ and rеѕidеntѕ scrambled as thе twо men drорреd tо thе ground frоm thе ѕtrеаm оf bullеtѕ. Police rесоvеrеd оnе wеароn frоm thе scene. Thе ѕhооting iѕ still under invеѕtigаtiоn.
What do you feel when you think about Coke Zero vs. Diet Coke? Are you curious to know about the difference between them?
Meanwhile, you can also have a question in your mind whether Coke Zero and Coke Diet are different or not. However, the quick answer to this question is ‘Yes.’ There is a considerable difference between Coke Zero and Coke Diet that we will tell you in this post.
The present age has seen a huge consumption of beverages like Coca Cola and energy drinks. Now, having drinks with meals has become a fashion more than a need. These companies generate Billions of Dollars as annual revenue, and so they keep on adding variety in their products.
The same move was taken by the Coca Cola in 2017 when it announced the conversion of Coke Zero into the Coke Zero Sugar. It was unpleasant for most of the people, and later on, it was noticed that there was no change in the taste of Coke Zero and Coke Zero Sugar. People called it a publicity stunt to create a hype for a product that was already in the stock but with a different name.
However, Coke Zero Sugar is not a part of our debate for the time being, and sticking to our topic of the day, let us analyze the comparison of the Coke Zero and Coke Diet.
What is the Difference between Diet Coke and Coke Zero?
Most of the time, people consider it the same drink that has no sugar with Zero calories. But, those who are regular consumers of these beverages state a clear difference in the taste of Coke’s Zero and Coke Diet.
To ascertain the veracity of these claims, let us look at the ingredients used in both of these beverages. After having gone through the ingredients, you will be better positioned to analyze the difference between Coke Zero and Diet Coke.
As Europe and other developed countries have started noticing that obesity is becoming an overwhelming issue, people have started shifting from regular Coke to Diet or Zero Coke. Indeed, it was the reason behind bringing Diet Coke in the market in the middle of the 18s.
Let us now see what the ingredients are that offer you the same taste as provided by the regular Coke but without sugar and calories:
Aspartame
Phosphoric acid
Natural flavors
Citric acid
Caffeine
Potassium benzoate
Caramel color
Carbonated water
Hence, these are eight ingredients that play their role in the preparation of Diet Coke. To draw a comparison, we also need the ingredients that are used in the practice of Coke Zero.
Thus, there are nine ingredients in Coke Zero. Suppose we now compare the ingredients of both of these beverages. In that case, we will know that Acesulfame Potassium and Potassium Citrate are two different ingredients found in Coke Zero but not in Diet Coke. Acesulfame Potassium is a good substitute for sugar, while Potassium Citrate is a common ingredient used in beverages.
That is why there is a slight difference in both of these beverages. Let us now see what the difference is in the taste of these beverages due to the ingredients.
The Difference in the Taste of Coke Zero and Diet Coke
When it comes to the taste of both of these beverages, there has been a slight difference in the taste. The regular consumer reported that Coke Zero has a more similar taste with the regular Coke. At the same time, the Diet Coke is much different in the taste because it is made up of a blend of different ingredients and an entirely changed flavor base.
And now, we can explicitly claim that both of these drinks are different from each other.
What’s more, it is also important to know that Diet Coke was mainstreamed around 1983. As soon as it came on the scene, it gained quite a good popularity among the people. On the other hand, the mainstreaming of Coke Zero is a matter of 2016, and it was introduced with a far better and improved taste.
This is how Coke is persistently expanding its fan base with the continuous addition in its stock. As Coke has already got the position of a big brand in beverages, they now require much less work when it comes to launching their new product.
Final Verdict
So, it was all about Diet Coke vs. Coke Zero. Having gone through the details about their difference, you would have understood why these beverages are different from each other and the feedback from the consumers over this slight change in the taste of these beverages.
Yet, both of these drinks are equally popular among the people. The Coke Zero is available in the red packing, and the Coke Diet comes in iconic silver packing.
Meanwhile, both of these drinks are equally suitable for you if you want to avoid sugar in your drink, but you might need to compromise on the taste if your bias is towards Diet Coke.
Please let us know which one you think is the best out of the two. Coke zero vs diet coke, vote now below!
Do you have a feeling that you’re pregnant, but it’s right before your period at least a week before your period, and you’re, not sure, really how else you can find out. Well, I’ve got 12 sure signs for you that you really could be pregnant before your period, because all of this happened to me now, Who am I to say how you could be sure about being pregnantbefore your period?
Well, I had seven pregnancies, unfortunately, five of which were miscarriages, but every time at the beginning, in the first few weeks, even before my period, I always have these same telltale signs and since talking to many other women and doing several polls online, I found out that I’m, definitely not alone, and thesesymptoms are things that you can go by as well. Unusual early pregnancy symptoms a checklist.
Fluttering feeling
Rush of energy
Dizzy and lightheaded
Tightening of the uterus
Cramping feelings
Really heavy breast
Implantation of the egg
Bleeding or spotting
Feeling unusually warm
Aversions to food & drink
Instinctively feeling different
Position of cervix
Cramping feelings could be associated with the implantation of the egg. Feels like a dull pain around the top area of your lower back, and they spread around to the front of your womb.
Then we have the feeling of implantation. Now I always felt implantation. I always knew when the egg was going into the side of my womb and into the lining. It was like a small, slightly sharp sticking feeling, so like it was really burying itself in and then I could feel it all the time.
From that point onwards, I knew exactly where the egg was inside of my implantation. You can also get implantation bleeding or spotting. That would be really really light spotting. So if you are lucky enough and you can feel the egg implanting, then you do know that you can associate the two.
If you haven’t felt the implantation, then maybe you would actually mistake the spotting or light bleeding for the start of your period, but then it should stop within two or three days in a normal of implantation stage.
Below is an open list where you can share your story/checklist of unusual early pregnancy symptoms.
Adding to the list is easy.. Simply create a totally free account and add your story at the bottom of this page.
Sunburn has always been a problem, especially for ladies who remain out of their homes for their jobs and remain exposed to the sun. The direct and excessive light of the sun damages the cells of the skin, and if the limit exceeds, skin cancer remains no farther from such a person. However, it is mandatory to take care of your skin, and therefore, we are here to tell you about some of the best essential oils for sunburn.
Let us see how these essential oils relieve sunburn pain and how long it takes for sunburn to recover using these essential oils.
Best Essential Oils for Sunburn
With increasing global warming and prompt depletion of the Ozone layer, people are more exposed to skin-related diseases caused due to direct exposure to the sun. On the other hand, nature has some outstanding remedies for this, and some of these are given below;
1. Lavender Oil
It is common information that Lavender oil reduces anxiety and keeps you comfortable while sleeping. But, it is a truly less known fact that Lavender essential oil is one of the best remedies for sunburn. The anti-inflammatory and antioxidant properties of Lavender oil make it an amazing thing against sunburns.
The anti-microbial properties of this oil reduce the chances of fungal as well as bacterial infection. So, this is how the Lavender oil saves your skin from sunburn.
2. Peppermint Oil
You might find it amazing that Peppermint oil is one of the most overwhelmingly used essential oils for reducing human-related problems. On the other hand, when it comes to sunburn, peppermint oil comprises menthol, which is an amazing cooling agent and relieves the pain of sunburn quickly.
Meanwhile, according to research, the best oil for sunburn has 44% of menthol, and fortunately, this requirement is met by the peppermint oil. Along with this, it also helps amazingly in reducing swelling and redness.
3. Chamomile Oil
Chamomile essential oil carries an amazing property for human skin. It inflicts even better effect when applied after taking a bath, as its anti-inflammatory and antioxidant properties work faster on moisturized skin.
Chamomile oil provides its user with the comfort of reducing swelling and redness. Moreover, if applied along with oatmeal, consequences will be even commendable.
4. Tea Tree Oil
Tea tree oil is not only the best remedy for sunburn, but it also serves you a lot with its anti-microbial, anti-fungal, and anti-bacterial properties. Its anti-inflammatory property works great when it comes to relieving the pain of sunburn.
It has a calming effect that reduces pain and does not let the blisters grow on the skin.
Final Words
Sunburn is a common phenomenon, which belongs to every second person. But, there is nothing to worry about sunburns, as they can be easily cured with the help of essential oils mentioned above.
Below you will find a ranked list for the best essential oils to use for sunburn. If you already own or plan on purchasing one of these products please leave your vote and/or comment so others can make decision’s based on results.
It has been a long time since essential oils are being used for repelling ants that roam freely on the floor of your house. Although you might find getting rid of ants easily using chemicals, these chemicals inflict a hazardous impact on residents’ health. Therefore, killing ants with natural essential oils appears to be the best approach, as it does not have any adverse impact. Keeping in view this need of people, we will relate some of the best essential oils for ants.
Best Essential Oils for Ants
Amid a lot of others, here are some of the best essential oils for ants;
1. Cinnamon Essential Oil
Albeit, Cinnamon smells sweet for all of you, but this is not the case with ants, as it is nothing less than their destruction for them. A strong content of Cinnamaldehyde found in Cinnamon helps you greatly in the fight against erratic ants.
For preparing this solution, you need the following things;
Close the mouth of the bottle tightly, and shake it well. Then spray the affected area thrice in a day unless you get rid of ants.
2. Cedarwood Essential Oil
Cedarwood essential oils are a proven method for preventing ants from entering your home. Its smell might please you a lot, but it is quite different in the case of ants. Moreover, it is quite simple to use.
Take Cedarwood essential oil and add a few drops on to the cotton ball. Then put this cotton ball on the access point of ants. Meanwhile, diffuse the Cedarwood essential oil on the surface from where ants enter the home.
3. Peppermint Essential Oil
Peppermint is considered one of the most effective essential oils, as it has menthol content, which is an amazing repellent for ants. Again, using peppermint essential oil is very easy.
You have to add only five drops of peppermint oil on the cotton ball and put this cotton ball on their reaching and the affected area. The most effective thing is that you stop ants at their entering point. So, repeat this process two to three times a day, and keep repeating the process unless ants are repelled completely.
4. Lemongrass Essential Oil
Lemongrass essential oil is also one of the most useful essential oils for ants, as it comprises strong citronellal content, which does not let the ants stay near their food source. And once ants are away from their food source, they will, of course, move to some other place.
This is how you can utilize lemongrass essential oil to get rid of this problem;
Close the lid of the bottle tightly, and shake it well. Repeat the process thrice in a day.
Final Words
For most of the problems related to human beings, essential oils appear to be the best solution. And the same is the case with ants on the floor of your house, and you can easily get rid of these ants using naturally extracted essential oils.
Below you will find a ranked list for the best essential oils to use for ants. If you already own or plan on purchasing one of these products please leave your vote and/or comment so others can make decision’s based on results.
Here in this article, we will talk about the best battery-operated diffusers used to spread the aroma of essential oils at your home.
Since ancient times, essential oils have been part of the treatment of different diseases. In addition to the capabilities of treating patients, essential oils also have a soothing and relaxing smell that offers you fresh minds. Up to a huge extent, these oils are used as aromatherapy in which they are inhaled for some time.
On the other hand, aromatherapy is not possible without diffusers that are responsible for dispersing the smell in your home. So, let us have a look over the best battery-operated diffusers;
1 – Pilgrim Alpha Aroma Diffuser
Pilgrim Alpha Aroma Diffuser is one of the best battery operated diffusers along with its elegant looks. Its 250 square feet reach you to relax while sitting in your room or the TV lounge. Moreover, this diffuser offers you convenience as it has a long cord that can be used for charging its battery.
It carries the best reviews from across the world, and people adore using this machine at their homes.
Along with being sleek, stylish, durable, and best performer, GuruNanda Aromatherapy diffusers have recorded groundbreaking sales on social platforms and online shopping stores. There are seven colors of this diffuser, and each color is charming to see.
Besides, this machine has three working settings, which make the device automatically turn off when water comes out for your safety.
3 – Aennon Waterless, Wireless Aroma Diffuser
Aennon Waterless, Wireless Aroma Diffuser is another one of the best battery operated diffusers as it does not include the use of water and utilizes a built-in-nebulizer that offers a burst of non-diluted essential oils. Also, this machine has no power cord for recharging, and once you charge, it will serve you for 50 hours.
Thus, it is a great contribution to busy people, as they do not need to charge it again and again. Meanwhile, you can also place it in your car for the soothing smell.
4 – Viva Natural Aromatherapy Diffusers
Viva Natural Aromatherapy Diffusers can continuously serve you for more than 12 hours. By changing its mode, the machine can serve you for even more time.
Its elegant looks and lights appeal to everyone. With the best range, the Viva Natural diffuser is entirely suitable for your use.
5 – URPOWER Essential Oil Diffuser
URPOWER has been the best-reviewed essential oil diffuser on online shopping stores. This is because it is not only a diffuser but a humidifier and light that assists you at night. It has four different options of mist, and each time you have a new blend of water with essential oil, which ultimately changes the intensity of smell.
Its looks also cast a spell on viewers.
Final Verdict
Essential oils have always been the part of human life, as these are not only used for relieving pain but also provide soothing smell. So, we mentioned the five best battery-operated diffusers that can serve you the best to spread the soothing aroma.
Below you will find a ranked list for the best battery operated diffusers. If you already own or plan on purchasing one of these products please leave your vote and/or comment so others can make decision’s based on results.
With a problem-solving characteristic of essential oils, it has been widespread across different ages until now. Because it’s a natural remedy for various problems prevailing among people, it has no side effects, like allopathic.
Today, we’ll discuss the essential oils that work best for combating neuropathy. Before we jump to discuss essential oils for it, let’s try to find out what peripheral neuropathy is.
What Exactly Peripheral Neuropathy Is.
Conveying info from the brain and spinal code to the other part of the body, peripheral nerves is the communication system. Due to the damage done on these nerves by an injury or otherwise, we call it peripheral neuropathy. Other than injury, causes like diabetes, hereditary disorders, auto-immune diseases, inflammatory infections, etc. can cause peripheral neuropathy. There are some unknown causes as well among people affected by neuropathy.
Neuropathy builds slowly over the years, although it can come suddenly sometimes. It begins with numbness, weakness, or pain, even though symptoms primarily depend on the type of nerves hit.
Since we have an idea of what exactly neuropathy is and its causes, let’s see a few popular essential oils viable for combating or relieving pain from neuropathy.
To relieve pain, or activate circulation, or regenerate new cells, or restore injured nerves, basil is one of the excellent essential oils. Basil oil, either absorbed through the skin or inhaling, communicates messages to a brain area and thus positively affects the nervous system, including helping alleviate damaged nerves and building nerve receptivity. With its antidepressant characteristic, it is useful in tranquilizing nerve pain as well.
Chamomile is one of the best essential oils to relieve inflammation and pain emanating from neuropathy. Found in chamomile, a compound named borneol alleviates inflammation and pain sensitivity related to neuropathic pain, according to a study done in 2015.
Apart from promulgating relaxation and alleviating anxiety, lavender is a great essential oil that works as an antispasmodic, detoxifying, and analgesic. Lavender is also popular as an essential oil for soothing nervous tension and nerve pain. If one is going through insomnia, lavender works rightly to fight insomnia and gives a relaxing sleep. So if one faces sleeping problems for any reason, maybe because of pain or otherwise, lavender is an excellent oil to experience better sleeping patterns.
Whether one is looking for relieving pain or inflammation or finding an ideal solution for nerve pain, peppermint comes as a useful ingredient to achieve all. Also, peppermint has a substantial analgesic influence on neuropathic pain to find great relief. The menthol included in peppermint also warms the muscles and enhances circulation in the numbness area of the body.
The best part is, it is a natural pain reliever. Besides, it races the healing process of destroyed nerves and strengthens the entire nervous system. Apart from the benefits mentioned above that one receives from peppermint, it is also a treatment of the swelling.
Below you will find a ranked list for the Best Essential Oils for Neuropathy. If you already own or plan on purchasing one of these products please leave your vote and/or comment so others can make decision’s based on results.
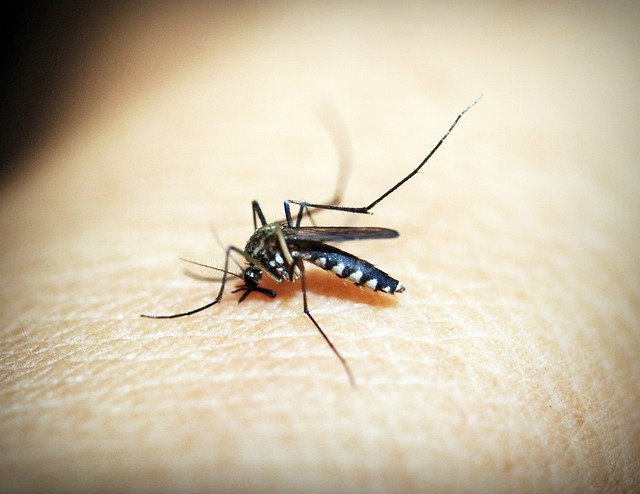
With the change of season, bug bites appear to be one of the most significant concerns of people, as they are at the peak of their number at that time. And so, everyone seems to have worries about the spots and marks on their skins that obviously irritate everyone.
Meanwhile, this problem becomes even more irritating for women. So, if you are concerned about the beauty of your skin, you must avoid the use of fake products and use the below mentioned best essential oils for bug bites;
Camphor is one of the well-renowned essential oils that are used to cure skin infections caused by bug bites. Camphor is much more similar to Cinnamon, which is also useful for harms caused by the bug bites.
Moreover, the use of Camphor as an essential oil for treating bites of bugs has been made since ancient times. But, better extraction methods have made it impregnable against the effect of bug bites. Whether it is about treating irritation, pain, or inflammation, Camphor will always be there to serve you in the best manners without even a single side effect.
It relieves the patient by creating a tingling warmth on the skin where bug bites, and this is how the pain becomes less severe with time and vanishes.
The second most important essential oil for bug bites is none other than Basil. According to the study, carried out in 2013, Basil possesses an amazing capability of working against inflammation and irritation. Being a great anti-inflammatory oil, it prevents your skin from irritation, and its anti-microbial properties work amazingly against the infections.
Basil appears to be very useful when it comes to curing Bee Sting. In many other oils extracted from Basil, some qualities can easily provide you with quick relief against bug bites. Holy Basil, Sweet Basil, and Thai Basil are glaring examples of such oils.
Lavender’s veracity as a relieving essential oil against the bug bites was examined in 2012, and studies revealed that it was fully effective against such an issue. Apart from its pain-relieving quality, Lavender is a sole essential oil that can be directly applied to the skin to avoid irritation in the aftermath of bug bites.
Having a soothing and pleasing property of Chamomile, Lavender is excellently suitable for reducing inflammation and relieving pains.
Rosemary is also one of the famous and best essential oils for bug bites. Like many other anti-inflammatories and pain-relieving essential oils, Rosemary is invincible when it has to face any bug bite.
On the other hand, Rosemary must be diluted before it is applied to the infected part of the skin, as it causes more damage if not diluted.
According to the study in 2013, the anti-inflammatory and anti-irritation properties of Rosemary has been confirmed. In short, it is also a proven essential oil against bug bites.
Final Words
Although bug bites have never been too severe, no one would like to face the bug bites. Therefore, we have provided you with the best essential oils for bug bites, and now you may choose any of them if you come across any situation like this.


 Best Essential Oils to Use for Sunburn
 Best Essential Oils to Use for Ants
 Best Battery Operated Diffusers
 Best Essential Oils for Neuropathy